Deutsch
 Select Country
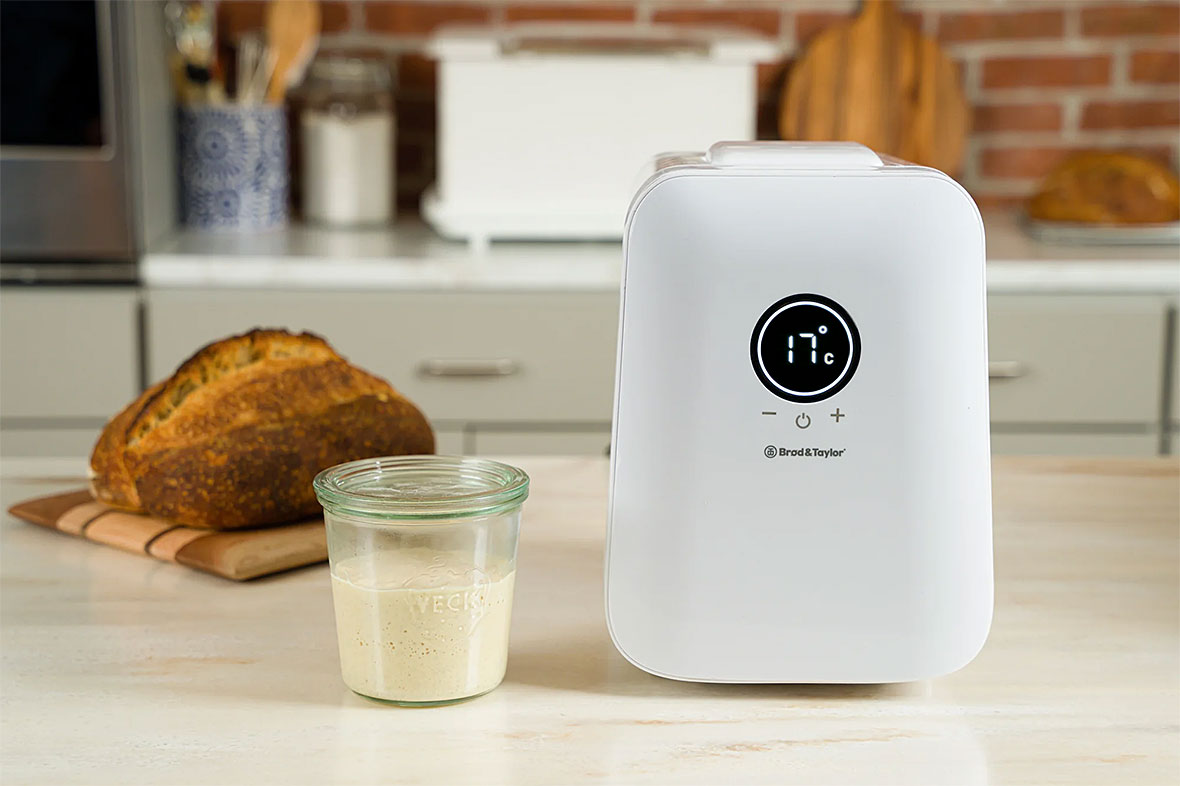
Maintain Your Sourdough Starter like Never Before with the Sourdough Home
Maintaining a vigorous and healthy starter is key to achieving great results with your sourdough bread. Understanding the needs of your starter and being able to provide the right environment will have a significant impact on the final result of your baking efforts.
Sourdough starter is a fermented mixture of flour and water that hosts a complex blend of microorganisms. Wild yeast and lactic acid bacteria feed on the flour, and their by-products are what leaven and flavor bread. By refreshing a starter with flour and water regularly, the microbes can stay alive and healthy. An active, well-cared-for starter is crucial to achieving great results in sourdough baking.
In addition to a food source, microbes need the right environment to thrive. Temperature directly and profoundly impacts fermentation activity- how quickly (or slowly) your starter will ripen. Therefore, when you have the bread-making tools to control the temperature of your starter precisely, it is easier to predict and control fermentation.
The first-of-its-kind Sourdough Home allows you to maintain your sourdough starter on your schedule with degree-by-degree control over the temperature.
Find a setting that generates a feeding schedule to work with your schedule. No matter your need, you’ll have a starter that’s ready when you are.
Degree-by-degree temperature control from 5–50°C (41–122°F) makes it possible to adjust the feeding schedule of your starter from hours to days, or even once a week. This means:
Benefits of the Sourdough Home
- Less discard, less waste, and less maintenance.
- It’s easier to predict the behavior of your starter, making it easier to plan your bakes.
- More control over the aroma and flavor profile of your bread.
- New possibilities for manipulation and experimentation (such as a pasta madre) otherwise not accessible to home bakers.
To learn more about creating a starter from scratch, read our article.
The Importance of Temperature for Sourdough Starter
If you maintain a sourdough starter, you are familiar with the issues that can come with a starter’s maintenance. Daily feedings can become a chore and sometimes forgotten altogether. Discard is wasted or builds up in the refrigerator. Fermentation activity can be unpredictable, especially in fluctuating temperatures. The Sourdough Home allows you to keep your starter at a constant temperature year-round, regardless of season or ambient temperature.
In addition to keeping it at one specific temperature, with the Sourdough Home, you can keep your starter at different temperatures to adjust your feeding schedule. Lower temperatures will slow fermentation, allowing you to go days between feedings.
Adjust Your Feeding Schedule
Precise control over a wide range of temperatures allows you to manage the fermentation rate of your starter and helps you control when your starter peaks. Weekend bakers may only want to feed their starter occasionally. Daily feeding is unnecessary and wastes a lot of flour. Often, bakers store their starter in the refrigerator as an alternative to feeding daily. However, refrigerator temperatures hover around 38°F (3°C), too cold for the microbes to stay active. When it comes time to bake, the starter may need multiple feedings to get it up to full strength and ready for baking. Using the Sourdough Home to store your starter is the perfect solution. By keeping your starter cool but not cold, you can slow down fermentation without bringing it to a complete halt. Your starter will stay healthy and ready to use when you’re ready to bake.
Why Not Refrigerate the Sourdoug Starter??
We ran a side-by-side comparison of starters kept at different cool temperatures. We kept one starter in a refrigerator at 38°F (3°C), and we kept the other in the Sourdough Home set to 50°F (10°C). We wanted three days to pass without feeding our starter- a common situation if you are away for the weekend. The seed ratio, hydration level, flour type, and beginning temperature were identical for each starter. The starter kept in the Sourdough Home experienced much more fermentation activity than the one held in the refrigerator. After 72 hours at 50°F (10°C), it was fully ripe, while the refrigerator starter was sluggish and showed little signs of activity.
Next, we used a portion of each starter to seed a levain. The levains were identical other than the starter used. Once mixed, the levains were kept at the same temperature (78°F / 25°C) to ripen.
After 6 hours, the results showed a clear difference. The levain seeded with the Sourdough Home starter had considerably more fermentation activity- tripling in size by the time the other levain had barely risen.
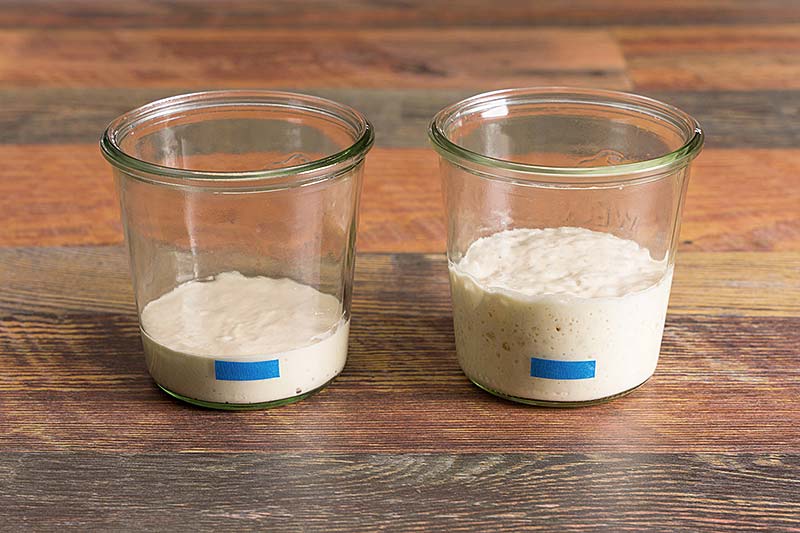
Left: starter held in a 3°C refrigerator for 72 hours.
Right: starter held at 10°C in the SD Home for 72 hours.
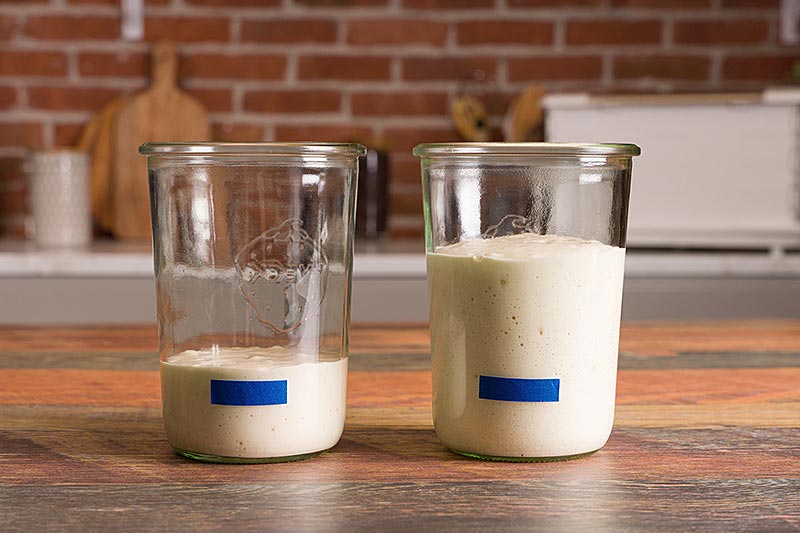
Left: levain seeded with a starter stored in the refrigerator for 72 hours.
Right: levain seeded with a starter stored in the SD Home for 72 hours.
Both levains were left to ripen at 25°C for 6 hours.
Feeding Schedule Guideline of Sourdough Starter
With the Sourdough Home, you can create a starter feeding schedule that works for you. Feed your starter once a day, every three days, or even once a week. Time to peak at various temperatures will depend on seed ratio, hydration level, and type of flour used. Experiment with your own starter to get desired results.
Using a constant feed ratio (the amount of starter: flour: water) and continuous temperature gives you great control over when your starter peaks. We have some guidelines below based on our experiments, but your results may vary depending on your starter.
Feeding Schedule by Temperature*
| Temperature | Time to Feed | Seed Ratioᐩ |
| 7 °C | 5 days / 120 hours | 1:4:4 |
| 10 °C | 3 days / 72 hours | 1:4:4 |
| 12 °C | 2 days / 48 hours | 1:4:4 |
| 20 °C | 1 day / 24 hours | 1:4:4 |
*Note: Your starter may vary from these results depending on the flour used and the specifics of your culture. These guidelines are based on a 100% hydration starter fed with all-purpose flour.
ᐩSeed Ratio: This is the ratio of active culture to fresh flour and water. The more active culture used, the faster your starter grows and peaks.
Experiment with Temperature to Influence Flavor
Not only can you maintain the perfect temperature and adjust the feeding schedule, but it is possible to use temperature to adjust the flavor profile. Lactic acid bacteria (LAB) far outnumber the yeast present in sourdough (roughly 100 to 1) and play a huge role in the flavor and aroma development of sourdough bread. Bacterial populations can be influenced by temperature, flour type, and hydration level.
There are three types of LAB found in sourdough, and they are classified by how they ferment sugars and the resulting by-products produced.
- Homofermentative LAB produce lactic acid.
- Heterofermentative LAB produce lactic acid, acetic acid or ethanol, in addition to carbon dioxide.
- Facultative Heterofermentative can switch between homofermentative and heterofermentative depending on environmental conditions (can switch between pathways depending on what sugars are available).
Facultative Heterofermentative can switch between homofermentative and heterofermentative depending on environmental conditions (can switch between pathways depending on what sugars are available).
Different temperatures will favor different types of LAB, so you can adjust the temperature of your starter or levain to suit your tastes over time. In general, homofermentative LAB favors warmer temperatures, and heterofermentative LAB favors cooler temperatures. There are mixed thoughts on what “warmer” and “cooler” are exactly, but in general, 30-35°C is on the warmer side, and 18-25°C is cooler. However, both types can grow outside of their “ideal range.” At warmer temperatures, LAB will be more active overall, and acids will accumulate faster- which can result in a more sour loaf.
LAB is only one piece of the picture. Wild yeasts thrive around 25 – 30°C. Within this temperature range is when they will be the most active, multiplying and producing the byproducts that leaven bread. This process will still occur at lower temperatures (yeast is more tolerant of cooler temperatures than LAB), albeit slower.
With living things, much is conditional, and many variables will impact the outcome. It is not as simple as drawing a straight line from point “A” to point “B.” Experiment with your starter, and find what works for your schedule and what flavors suit your taste.
To learn more about other factors influencing flavor in sourdough, such as flour type and maturity level, read our article How to Make Sourdough More (or Less) Sour.
Ready When you are Sourdough Starter
Fermentation activity would be a bell curve if graphed. After feeding, the activity exponentially increases as the microorganisms feed and reproduce. Once this activity reaches a peak, there is a drop-off as the food source disappears, and the population of microorganisms begins to die off. The ideal time to feed or use a sourdough starter is when it peaks or shortly after. Doing so will ensure the yeast and bacteria populations are at their height and fermentation activity is strong. Use it too soon, and the starter will not be vigorous enough. Wait too long, the starter will become overly acidic, and the yeast population will decrease. With the Sourdough Home, you have more control over when your starter peaks, setting you up for better success when it’s time to bake.
Control the Temperature. Control Your Timeline
With precision temperature control, the Sourdough Home creates an environment of your choosing, making it easy to maintain and prepare your starter for baking. You no longer need to worry about your starter (or levain) over-ripening before you are ready or being underripe when you are. Keep it in the Sourdough Home and set the desired temperature to fit your timeline.
Ready to bake? Try this Beginner Sourdough Bread recipe to get you started, learn How to Make Sourdough More (or Less) Sour, and explore our range of culinary products designed to help you achieve professional results at home.