Deutsch
 Select Country
Instructions for dehydrating with the SAHARA dehydrator
The first steps in dehydration
Start with fresh ripe food. Clean them thoroughly. Cut away all spoiled areas. For best drying results in the dehydrator, food should be cut into thin and even slices, 3-6 mm. A food slicer (mandolin) is recommended to cut large quantities with consistent thickness quickly and accurately.
No pre-treatment of the food is required before drying. One of the advantages of drying your own food is the avoidance of chemicals or additives that might be present in commercial drying processes. Slight discolouration of foods like apples is natural oxidation and does not affect the taste.
Blanching food in boiling water or steam before drying can speed up the drying process and kill microorganisms on the surface of the food that can lead to pre-ripened spoilage. If you do not plan to store dried food for several months, this may not be important. Be aware that blanching, especially if done for too long, can affect the taste and texture of the dried food. Place the food slices in individual layers on the trays. Make sure that the slices do not overlap. Ideally, there should be a small space around each piece.
Time to dry
Many factors influence the drying time of food. The most important are the type of food and the quantity, the thickness of the slices, the temperature and humidity in the room and the selected temperature setting for dehydration. Food dries faster when the air inside and outside the dehydrator is hotter and drier (low humidity).
Temperature for drying
The optimal drying temperature is usually the highest temperature that does not affect the nutritional content of the food. Meat must be dried at higher temperatures to eliminate harmful microorganisms that may be present in the meat. Herbs, nuts and seeds should be dried at lower temperatures.
As the food begins to dry, evaporation causes it to cool. In some cases, the food temperature may be as much as 35°F (20°C) below the temperature of the air in the dehydrator. As the food dries, the food temperature will eventually be the same as the air temperature in the appliance. Since food dries faster at higher temperatures, drying time can be shortened by raising the temperature for the first few hours while the food is fairly wet and then lowering the temperature for final drying. The dual time-temperature function of the Sahara dehydrator makes this possible.
| Type of food | Typical temperatures for drying |
| Fruit | 57º C |
| Vegetables | 52º C |
| Meat | 74º C |
| Nuts, seeds | 35º C |
| Herbs, flowers | 35º C |
Dry fruit
Fruits are among the most popular of all dried foods and are a great way to start dehydrating. Drying ripe fruit makes a healthy snack that concentrates flavours. Dried fruits are nutritious, light and easy to transport.
Many fruits are naturally covered with a skin, which is a great natural barrier to drying. Slicing brings out the inside of the fruit, which dries faster. The thinner the slices, the faster the food dries. Smaller fruits such as grapes can be dried whole, although the drying time may be longer.
If the fruit is not sliced, blanching in boiling water or steam is often recommended to make the fruit skin more porous and speed up drying. However, blanching can result in a “cooked” taste in dried fruit. Don’t be afraid to try longer dehydration times with all-natural and unprocessed fruit. The results can be far superior.
Instructions for drying fruits
Temperature: 57°C
| Fruits | Time | Notes |
| Apple | 7-15 hours | Leathery or crispy depending on taste |
| Apricots | 20-28 hours | The best way is to cut them into 6mm or thicker slices. |
| Bananas | 6-10 hours | For best results, do not dry too much |
| Berries | 10-15 hours | Leave it all. |
| Blueberries | 10-15 hours | Leave whole, place in boiling water to dry faster |
| Cherries | 13-21 hours | Dry until they become sticky. |
| Cranberries | 10-12 hours | Leave whole, put in boiling water to dry them faster. |
| Figs | 22-30 hours | For best results, do not dry too much |
| Grapes | 24-36 hours | For best results, do not blanch |
| Nectarines | 8-16 hours | The best way is to cut them into 6mm or thicker slices. |
| Peaches | 8-16 hours | The best way is to cut them into 6mm or thicker slices. |
| Pears | 8-16 hours | Leathery or crispy depending on taste |
| Pineapple | 10-18 hours | The best way is to cut them into 6mm or thicker slices. |
| Strawberries | 7-15 hours | Dry until they become sticky. |
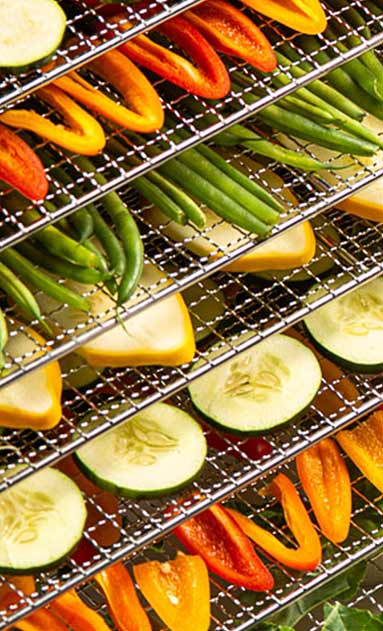
Drying vegetables
Vegetables are usually dried for preservation and storage, unlike fruits, which are mainly dried as snacks and eaten dry. This affects the method used for drying. Vegetables should be dried completely until they become brittle (5% moisture). It is also recommended to stop the enzymatic processes that lead to spoilage. Blanching also retains colour and flavour. Choose vegetables for drying that are ripe and very fresh. To steam vegetables, steam them over boiling water in a sieve(without touching the water). Vegetables should be steamed until soft, usually for several minutes. After blanching, divide vegetables between trays to cool before placing them in the dehydrator. Several vegetables do not require prior blanching, including peppers, onions and mushrooms.
Instructions for drying vegetables
Temperature: 52°C
| Vegetables | Time | Notes |
| Asparagus | 5-6 hours | Blanch. Dry until brittle. |
| Beetroot | 8-12 hours | Steam and peel. Dry until it is pliable. |
| Broccoli | 10-14 hours | Blanch. Dry until brittle. |
| Brussels sprouts | 24-48 hours | Blanch. Dry until brittle. |
| Cabbage | 7-11 hours | Blanch until wilted. Dry until brittle. |
| Carrots | 6-10 hours | Use fresh carrots. Blanch. Dry until leathery. |
| Cauliflower | 8-12 hours | Blanch. Dry until brittle. |
| Celery | 3-10 hours | Blanch. Dry until brittle. |
| Maize | 6-10 hours | Blanch. Dry until brittle. |
| Mushrooms | 4-10 hours | Dry until leathery. Start at a low temperature. |
| Onions | 4-8 hours | Dry to leathery. |
| Peas | 4-8 hours | Blanch. Dry until brittle. |
| Paprika | 4-8 hours | Dry to leathery. |
| Potatoes | 6-14 hours | Blanch thoroughly. Dry until brittle. |
Drying dried meat
Processing meat for into jerky is one of the best ways to get the most out of your jerky machine. Whether you’re a hiker, an athlete or just enjoy the protein value, jerky is healthy, convenient and delicious. Make jerky from lean cuts of meat with as little fat as possible. Fat will not dry and will shorten the shelf life of the dried meat. The meat should be cut thinly, less than 6 mm thick. It is easiest if the meat is partially frozen before cutting. Use a very sharp knife. Cut against the grain of the meat for a more brittle result, or with the grain to make the dried meat easy to chew. Prepare a marinade and plan to marinate the meat in the refrigerator for at least 8-24 hours. There are many recipes available or you can create your own.
Health warning
When drying meat, make sure that all traces of contaminants such as E. Coli or salmonella have been destroyed. Make sure that the shelves and the inside of the dehydrator are clean. Keep meat cool until it is placed in the dehydrator. The safest process involves one of the following:
- Heat the meat in a conventional oven before drying so that the internal temperature of red meat is 71°C and poultry 74°C. Once these temperatures are reached, the meat is safe enough to be dried in the dehydrator. Note that this process will change the texture and flavour of the dried meat.
- Dry the meat at least at 63-70°C and for at least 4 hours. When ready, heat the dried meat in a preheated oven at 135°C for 10 minutes.
Agricultural science departments at many universities have published excellent articles on food safety in the production of dried meat with whole meat cuts, minced meat, poultry, fish and game. For more information, see: http://foodsafety.wisc.edu (Search for “jerky”) https://www.usda.gov/ (Search for “jerky“) https://www.cals.uidaho.edu/edcomm/pdf/PNW/PNW0632.pdf
Drying beef
Rich in flavour, protein, phosphorus and iron – beef is the most traditional dried meat. When making dried meat from the whole muscle, trim off excess fat and cut the meat no thicker than 6 mm. Fat spoils and limits the shelf life of your dried meat. Rump, sirloin or flank steak are among the most popular cuts of beef for making jerky. If you want to make jerky from chopped beef, use meat that is at least 93% lean. If you are using a prepared marinade, cover the meat evenly and leave the marinade to marinate for 8-24 hours before drying; the longer the better. Drain the marinade and pat off any excess well before placing the meat in a single layer in the dehydrator.
Dry poultry
Even if it’s not the most common type of dried meat – dried poultry is a unique alternative to beef and contains just as much flavour. Remove as much fat as possible with a sharp knife and then season or marinate it as you would beef. Poultry is much richer in fibre than regular beef, so expect your dried meat to be a little brittle.
Dry fish
If you are looking for a high-protein snack with less cholesterol than red meat, dried fish is the best option. The fish must be kept very fresh before drying to prevent spoilage. Choose fish with low oil content, such as tilapia, pink salmon and tuna; the higher the oil content, the faster the fish will spoil. After seasoning in the same way as for poultry or beef, place the fish in a single layer in the dehydrator.
Drying game meat
Another alternative to traditional beef jerky is venison and elk meat. Wild animals can often harbour dangerous bacteria not found in store-bought meat. For this reason, use your own discretion to consult separate recipes and safety precautions not included in this manual before attempting to dehydrate game meat.
Instructions for drying meat
| Temperature | Time | |
| Beef | 71° C | 4-5 hours |
| Chicken | 74° C | 4 hours |
| Turkey | 74° C | 6 hours |
| Fish | 74° C | 12-14 hours |
| Game meat | Varies | Varies |
Product information SAHARA foldable dehydrator
Frequently Asked Questions about the SAHARA Dehydrator and FP-205 Fermenter & Schongarer